Create curve
![]()
Access
- In the Designer tab, click the
 icon in the Wireframe section of the ribbon.
 - Activate the Wireframe tab and then click the icon in the Curves section of the ribbon.
- Type curve in the Quick Search field and select Create curve from the result list.
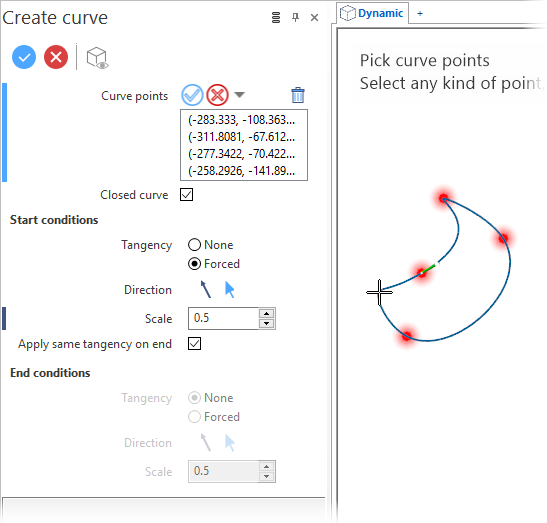
This displays the Curve - Options tab along with the ribbon containing the Filters, Selection and Attributes sections. In addition, the Create curve dialog box is displayed. ![]() (See dialog box).
(See dialog box).
Procedure
- Click on the start point of the curve.
- Click on successive points to form the curve.
- If you want to close the curve, activate the Closed curve option in the dialog box.
-
Validate, either by a Right Mouse click or by clicking the
 icon in the dialog box.
![]() Notes:
Notes:
- Clicking again on an already selected point cancels its selection.
-
While in point selection mode, pressing the [Pg Down] key on your keyboard allows you to successively deselect the previously selected points.
- Use the Attributes toolbox to modify the created entities.
-
Sketch plane creation may be automatic.
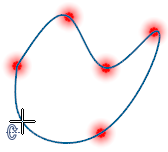
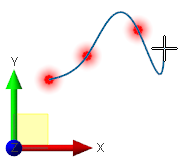
Example of open curve

Example of closed curve
Defining the Start and/or End Conditions
The start and end conditions allow you to apply a fixed direction and a weighting factor so that the created curve is fully tangential with the direction as applied at the start and/or end application point.
- Select the Forced option in the Start conditions and/or End conditions section of the dialog box.
- Click on the start point of the curve.
- Click on successive points to form the curve.
- Click the
 icon and select a direction:
 - You can define the direction according to the direction options.
- You can also select a reference segment/line. In this case, use the Space bar to switch between the possible directions along the selected segment/line.
- Right click or click the
 icon to validate.
 - Enter the Scale in the corresponding field.
- Validate, either by a Right Mouse click or by clicking the icon in the dialog box.
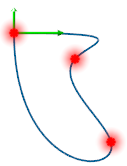
If you want to apply the same tangency for the start and end of the curve, activate the Apply same tangency on end option.
The selected direction is then represented by a green arrow in the graphic area.
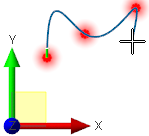
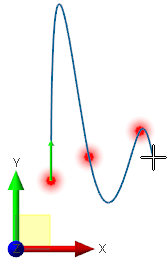
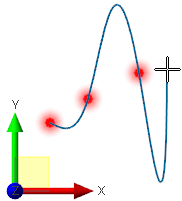
The larger the parameter, the further the curve will 'stay' in the direction of the selected axis. For example, if you define a small value (e.g. 0.1), the curve will start at the first point and will follow the selected direction for a short distance. If you define a higher value (e.g. 0.9), the curve will follow the selected direction for a longer distance.
|
|
|
Forced start direction along the Y axis. Scale = 0.2 |
Forced start direction along the Y axis. Scale = 0.8 |
|
|
|
Forced end direction along the Y axis. Scale = 0.2 |
Forced end direction along the Y axis. Scale = 0.8 |
Cancelling the Force Start/End Conditions
- Select the None option in the Start/End conditions section of the dialog box.
Start and End conditions can be forced independently for open and closed curves, as shown in the following example for a closed curve:
Dialog Box Options
Top Toolbar
![]()
![]()
![]()
These two icons at the top of the dialog box allow you to Apply the current values or to Cancel the current function.
Preview generation is Automatic if this option is active in the dialog box menu accessed by clicking on the  icon. If this option is not active, click on the
 ![]() icon. If preview generation is not possible, the icon is greyed out.
icon. If preview generation is not possible, the icon is greyed out.
Curve Points Field
Clicking on the ![]()
![]()
![]() icon and then click Reset selection to reset your whole selection. Use the
icon and then click Reset selection to reset your whole selection. Use the ![]() icon (or Right Mouse click) to Validate your selection. The
icon (or Right Mouse click) to Validate your selection. The ![]() icon (or [Esc]) cancels the selection mode. If you want to delete elements within your selection, select the required elements and then click the
icon (or [Esc]) cancels the selection mode. If you want to delete elements within your selection, select the required elements and then click the ![]() icon above the list field. You may use the [Ctrl] + [A] shortcut to select all of the elements.
icon above the list field. You may use the [Ctrl] + [A] shortcut to select all of the elements.
Information Field
The field at the bottom of the dialog box displays information about missing data, errors or actions.